
Lemmings DS Builder
Mathew Carr
Reference - 06/09/06
Please observe the following:
Text input dialog items do not work like their Windows counterparts! You must leave the mouse against the text to edit it. If you move the mouse away, the text entry cursor will disappear.
The level editor screen is divided into four parts: The UPPER panel, the LOWER panel, the RIGHT panel, and the LEVEL pane.
The UPPER panel
The UPPER panel holds a number of options relating to the level as a whole.
New Level
This clears all level objects, level areas, level information, custom level database objects and palettes, (special object palettes are reset to default) leaving a completely blank level.
Load Level
This will bring up a dialog asking you to locate the Lemmings DS Level (.lds) file that you wish to load.
Save Level
This will bring up a dialog asking you to locate the Lemmings DS Level (.lds) file that you wish to save. If you do not supply the .lds extension to the filename, then it will be added automatically.
Level Info
This will bring up the following dialog:
|
Level Name You can enter the name of your level here (A maximum of 30 printable ASCII characters). You do not need to add the 'Level' prefix, although you may if you wish. You may want to do this if you are planning on creating a set of related levels. It will look neater if all of the level numbers are right-aligned, like the standard level set. (Use the two XXs as a guide) Number of Lemmings The number of Lemmings that will be released from the entrances in total. To Be Saved (Lemmings) The number of Lemmings that must be saved to complete the level. The percentage displayed ingame is calculated automatically. If wish to use an exact percentage, make sure to work the number of Lemmings to release and save out beforehand. Time The time the player has to complete the level. This can be in the range 1-9. Rating You can select a rating to describe your level. This does not affect its placement in the ingame level list! This will only appear on the top information screen, and the briefing screen before beginning the level. If you do not wish to rate your level, leave this set to Custom. (The Release Rate is set on the LOWER panel.) |
Save Image
This allows you to save a BMP screenshot of your entire level. You will be prompted for the location to which to save the file. If you do not supply the .bmp extension, it will be added automatically.
Scroll
This indicates how for along the screen the 'camera' is along the level as a percentage from 0% (far left) to 100% (far right).
Import 16/256 Img
These items allow you to import a 16 or 256 colour BMP file into the custom object database. You will be asked to locate the file to load. If the file cannot be read, or it is the wrong colour depth, then you will be asked if you would like to retry loading the file.
After loading a BMP to the object database, it can be found in the Custom 16/256 pages within the Texture Selection page on the RIGHT panel.
If you hold the right mouse button while clicking this menu item, the palette within the picture will also be loaded into the level palette. If you loaded a 16 colour image, you will be prompted to choose which line of the level palette you wish to overwrite with the new palette.
It is possible to use this tool to import an entire level's graphics from a single large BMP file. To do this, make sure that your BMP file is either 16 or 256 colours, with the transparent colour set to index 0, and then import it together with its palette. You can then find it in the custom object database on the RIGHT panel. Select it as ready and make a new texture object spanning the entire level. After that, simply place the special objects and set the level info.
Import 16/256 Pal
These items allow you to import the palette from a 16 or 256 colour BMP file into the level palette. You will be asked to locate the file to load. If the file cannot be read, or it is the wrong colour depth, then you will be asked if you would like to retry loading the file.
If you loaded a 16 colour image, you will be prompted to choose which line of the level palette you wish to overwrite with the new palette.
Use the Palette Mapper page on the RIGHT panel to map this palette.
About
This displays a bit of information about the current version of the program.
Quit Editor
This will exit the editor. You will be prompted to confirm that you wish to this, as all current level data and object database entries will be lost upon exit. If you choose not to exit, note that your current level data is not automatically saved.
The RIGHT panel
The RIGHT panel holds information about level objects, the current palette mapping, the level palette and special objects.
It consists of four separate pages; you can change the current page by clicking the two arrows next to the page name.


The Texture Selection page
This page allows you to select the current ready texture image from the object database.
|
|
Ready Texture Preview This item appears on the Texture Selection, Palette Mapper and Palette Editor pages. It shows you the current ready texture, as mapped using the current mapping onto the current level palette. If you begin to draw a texture into the level, this is the texture and mapping that will be used. Displayed next to the texture preview is the name of the texture, the texture's size in pixels, and the texture's colour depth. You can cycle through four levels of zoom on the texture by clicking on the preview rectangle. Current Object Database Page This shows the current page of the object database displayed in the texture selection grid. You can cycle between different pages of the same type of texture by clicking on the arrows next to the box. You can cycle between the four different texture types by clicking on the box itself. The available texture types are as follows: Standard 16/256, which are built into the Lemmings DS ROM. Custom 16/256, which consists of the textures which you have imported yourself using the Import 16/256 Img tools on the UPPER panel. You are encouraged to use the standard textures wherever possible: importing custom textures will increase your level's size greatly. Texture Selection Grid This displays 16 of the textures from the current texture type as they would be applied under the current palette mapping. You can preview the textures as they would appear using the default mapping if you hold the right mouse button. You can cycle between different pages by clicking on the arrows next to the current object database box. |
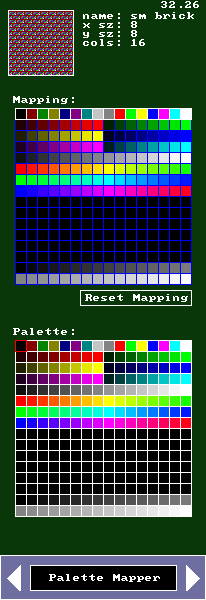
Palette Mapper
This page allows you to change the current palette mapping on the ready texture, which is applied to new textures. Depending on the current texture's colour depth, you can assign a selection of 16 or 256 colours with which to paint new textures drawn into the level.
|
|
Ready Texture Preview See the explanation on the Texture Selection page. Palette Mapping Grid This shows the current palette mapping applied to the current level palette. Depending on the current texture's colour depth, you can assign a selection of 16 or 256 colours with which to paint new textures drawn into the level. Clicking a cell with the left mouse button will apply the currently selected level palette colour into the current palette mapping at that point. Clicking a cell with the right mouse button will copy that colour as the currently selected level palette colour. Almost all textures are designed so that the colour of the colour position 0 is transparent. If you assign a colour from the level palette other than colour 0 to this cell, then you may cause unsightly opaque blocks to appear. Conversely, you can assign colour 0 from the level palette to any of the colours within the ready texture and cause transparent areas to be created. Using clever combinations of colour 0 and opaque colours can create interestingly shaped opaque areas. Level Palette Grid This displays the current level palette. Clicking on a cell with the left mouse button will select that colour for assignment. Holding right mouse button while clicking a cell will cause that line of colours to be mapped into the first 16 colours of the current palette mapping. This is useful if you have several 16 colour palettes contained in separate lines of the level palette and you need to copy them into the current palette mapping. The colour in the top left, colour 0, represents the transparent colour. If this is assigned to a cell in the current palette mapping, then any areas of the texture which use that colour will be transparent. Reset Mapping Clicking this button will change the current palette mapping to match the current level palette. |
Palette Editor
This page allows you to modify the colours within the current level palette.
|
|
Ready Texture Preview See the explanation on the Texture Selection page. Level Palette This shows the current level palette. It consists of 256 colours. The first colour represents transparency, and other colours are used ingame for special features. You can select two colours at any one time, colour A (represented by a red square on the grid) with the left mouse button, colour B (represented by a blue square) with the right mouse button. The special colours are as follows:
Colour Editor This displays the current A and B colours. The sliders below allow you to modify the amounts of red, green and blue which make up colour A. Copy A to B This copies colour A into colour B. You will see this change reflected on the objects within the level. Copy B to A This copies colour B into colour A. You will see this change reflected on the objects within the level. Light Swap This swaps colour A with colour B. You will see this change reflected on the objects within the level. Deep Swap This swaps colour A with colour B. This is a special swap which does not affect the objects in the world. You can use this to rearrange the palette without any fear of altering the world. Grad A to B This changes all of the colours between A and B (remember that the palette is 16 horizontal lines running from left to right) so that they form a smooth gradient. For example, look at the lower two lines in the image, notice how the colour gradually changes from black to white over two lines. |
Special Objects
This page allows you to create and delete special interactive level objects and modify their palettes. Each special object type has its own palette.
|
|
Current Special Object Box This displays the currently selected special object type. You can select the current object type by using the arrows next to the box. There are currently three objects: Entrance, which Lemmings drop out of. There can be up to eight Entrances, which are numbered upwards from zero in the level. Lemmings fall out of the Entrances in ascending order. Entrances can be set to create Lemmings facing either left or right. Be careful not to make Entrances too high above the ground, otherwise the Lemmings will smoosh when they hit the ground. (You can do this intentionally, like in Lemmings 1, Mayhem Level 1: "Steel Works".) Exit, the goal which the Lemmings must reach. You can place up to eight Exits. Take care placing the Exit, making sure that the base of the Exit touches the ground. If, when testing the level, Lemmings walk through the exit, try moving it lower. Lemmings can use the Exit if they're slightly above its base, but not lower than it. Flametrap, which instantly kills any Lemming which approaches. You can place up to sixteen Flametraps. Flametraps can also damage Lemmings which are slightly above or below it. Add Object This sets the current editing mode to create new special objects of the currently selected special object type. To place the special object in the world, click this button with the left mouse button and then click and hold the left mouse button in the world to place the new object. Delete All This removes all special objects of the currently selected special object type. This is useful if you have managed to place a special object in an awkward to select position. Special Object Palette This displays the palette for the currently selected special object type. Each special object type has its own palette, which can be manipulated with the palette controls below. Like the Palette Editor page, you can select two colours at any one time, using the left and right mouse buttons. Colour A and B are again represented by red and blue squares on the grid. Water Status This displays water, using the current water palette. Water kills any Lemming which comes into contact with its surface. Add Object This sets the current editing mode to create new water objects. To place the water object in the world, click this button with the left mouse button and then click and hold the left mouse button in the world to place the left hand side of the water object. Use the scale texture button in the LOWER panel to manipulate its size after initial placement. Delete All This removes all water objects. This is useful if you have managed to place a water object in an awkward to select position. Water Palette This displays the palette using which the water is drawn. It can be manipulated with the palette controls below. Like the Palette Editor page, you can select two colours at any one time, using the left and right mouse buttons. Colour A and B are again represented by red and blue squares on the grid. Colour Editor The sliders below allow you to modify the amounts of red, green and blue which make up colour A. Copy A to B This copies colour A into colour B. You can use this tool to copy a colour from a special object palette to the water palette or vice versa, but not from one special object palette to another. Copy B to A This copies colour B into colour A. You will see this change reflected on the objects within the level. You can use this tool to copy a colour from a special object palette to the water palette or vice versa, but not from one special object palette to another. Light Swap This swaps colour A with colour B. You can use this tool to swap a colour from a special object palette to the water palette or vice versa, but not from one special object palette to another. Grad A to B This changes all of the colours between A and B so that they form a smooth gradient. You cannot use this to make a gradient which spans a special object palette and the water palette. Default Pal This replaces the palette in which colour A appears with the default palette for that particular special object type. |
The LOWER panel
The LOWER panel holds various tools for manipulating level objects, special objects, special areas within the level. It has two different pages, Texture Object and Area Setup. You can switch between the two pages by clicking the Tex / Area button.
Texture Object Manipulation Page
This page allows you to create, move, scale, reorder and delete the level texture objects which make up the landscape of any Lemmings level, and modify their palettes.
|
|
|
Select Textures This sets the current editing mode to select or move existing level texture objects in the level. While this tool is selected, you can select level texture objects by clicking on them. Selected level texture objects have a blinking yellow border. You can select multiple level texture objects if you hold shift while clicking the additional objects. To select all objects in the level, right mouse click this tool. To move all selected objects, click and hold the mouse over any already selected objects, and then drag them to the new position. Any objects which hang over the edge of the level will be cropped. Any objects which hang over the top or left edges of the level will have their scaling adjusted. Select Spec. Objs. This sets the current editing mode to select or move existing special objects in the level. While this tool is selected, you can select special objects by clicking on them. Selected special objects have a blinking yellow border (water has a blue border). You can select multiple special objects if you hold shift while clicking the additional objects. To select all special objects in the level, right mouse click this tool. To move all selected objects, click and hold the mouse over any already selected objects, and then drag them to the new position. Selected Entrances will show you the direction their new Lemmings will face, together with a number (from zero) showing you the order the Lemmings will appear. You can alter the order with the Push Backwards and Pull Forwards tools, and flip their direction with Flip Selected. Grab Texture This copies the texture and palette mapping of the closest selected level texture object into the ready texture. Solid textures are not grabbed. Apply Texture This copies the texture and palette mapping of the ready texture into all selected level texture objects. Solid textures are replaced with this tool. Use Grab Texture and Apply Texture to modify the palettes of existing level texture objects in the level. New Cur Texture This sets the current editing mode to create new level texture objects based on the current ready texture. To place the level texture object in the world, click this button with the left mouse button and then click and hold the left mouse button in the world to place the top left corner of the new object, then drag out to the bottom right hand corner. New Solid Texture This sets the current editing mode to create new solid level texture objects based on the first colour in the palette map. To place the level texture object in the world, click this button with the left mouse button and then click and hold the left mouse button in the world to place the top left corner of the new object, then drag out to the bottom right hand corner. Push Backwards This pushes all selected level texture objects back one by one object. Use this tool if you wish to move a level object behind another one. This tool also causes all selected Entrances to move down the list of Entrances, so created Lemmings will appear later. Pull Forwards This pulls all selected level texture objects forward one by one object. Use this tool if you wish to move a level object to in front of another one. This tool also causes all selected Entrances to move up the list of Entrances, so created Lemmings will appear sooner. Flip Selected Clicking this tool with the left mouse button
flips the texture of all selected level texture objects horizontally. This tool also causes the direction of all selected Entrances to flip. Scale Texture Clicking this tool deselects all selected objects. Click and hold the left mouse button over any level texture object to move its top left hand corner, and click and hold the right mouse button over any level texture object to move its bottom right hand corner. You can also use this tool to manipulate water objects. Dupe Selected This sets the current editing mode to duplicate all currently selected level texture objects. Once clicked, click and hold the left mouse button in the level to position the object copies. Delete Selected This deletes any currently selected level texture or special objects.
Subtractive Clicking this tool toggles 'Subtractive' for all selected level texture objects. If 'Subtractive' is unset (default), then the selected level texture object will be drawn normally. If it is set for a selected level texture object, then the visible area (non colour 0) of the object will overwrite any colour beneath it with transparency. This is useful for 'punching a hole' through other objects into transparency. Mask Behaviour Clicking this tool cycles through three states of Mask Behaviour for all selected level texture objects. Mask Behaviour controls how level texture objects behave when stacked. If 'Mask Behaviour' is unset for a selected level texture object, then it will appear above or below other objects normally. If it is set to white, then the object will only be drawn where other objects have already been drawn below it. This is useful for using other objects to make the shape of an area, and then using a shape with Mask Behaviour white to texture the shape with a specific texture. If it is set to red, then the object will only be drawn where no other objects have already been drawn below it. This looks the same as pushing the object to the furthest away position, except the selection tool will select it as if it were above those shapes.
Release Rate and Lemming Tools To alter the Release Rate and Lemming tool counts, hold left mouse button over a panel to increase its value, and hold right mouse button to decrease it. The range for the Release Rate is 1-99, the range for any Lemming tool is 0(blank)-99. Objects and Filesize Display This shows the current amount of level texture objects in the level, together with the expected file size of the level. You should endeavour to keep the file size as low as possible.
Texture Manipulation Sliders These sliders control the texture scaling and scrolling parameters of all selected texture objects. The TOX and TOY sliders control the scrolling offset of all currently selected texture objects. If the textures on your objects do not match up correctly at the sides, try manipulating these sliders. Drag TOX to the left to move the texture to
the right, and drag it to the right to move the texture to
the left. The default values for these parameters is 0 (no offset). The TSX and TSY sliders control the scaling of all currently selected texture objects. Drag TSX to the left to make the texture
appear horizontally larger, and drag it to the right to make texture
appear horizontally compressed. Dragging either of these parameters below zero will mirror the texture horizontally or vertically. The default values for these parameters is 256 (normal scaling). If you hold the right mouse button while dragging a slider, it will snap to positions which are a power of 2. (Positive and negative.) |
Area Setup Page
This page allows you to create, move, scale and delete the level areas which give special properties to the landscape of a Lemmings level.
|
|
|
Select Area This sets the current editing mode to select or move existing level areas in the level. While this tool is selected, you can select level areas by clicking on them. Selected level areas will blink. You can select multiple level areas if you hold shift while clicking the additional areas. To select all areas in the level, right mouse click this tool. To move all selected areas, click and hold the mouse over any already selected areas, and then drag them to the new position. Any area which hang over the edge of the level will be cropped. New Steel/Oneway Area This sets the current editing mode to create a new level area. To place the level area in the world, click this button with the left mouse button and then click and hold the left mouse button in the world to place the top left corner of the new object, then drag out to the bottom right hand corner. You can place up to 32 steel areas and 8 one way areas, shown by the numbers below. Flip Oneway This will flip the direction in which Lemmings can bash, mine or explode through scenery within all selected one way areas. It is shown as a white triangle within the areas, pointing in the direction that the Lemmings must bash to damage the scenery. Scale Area Clicking this tool deselects all selected areas. Click and hold the left mouse button over any level area to move its top left hand corner, and click and hold the right mouse button over any level area to move its bottom right hand corner. Dupe Selected This sets the current editing mode to duplicate all currently selected level texture objects. Once clicked, click and hold the left mouse button in the level to position the object copies. Reposition Focus This sets the current editing mode to place the initial camera focus object. (Shown on the level as a small red box with a white border.) Click and hold anywhere on the level with the left mouse button to place the camera focus object.
Release Rate and Lemming Tools See the description on the Texture Object Manipulation Page.
Texture Manipulation Sliders Inactive. |
Keyboard Shortcuts
Left, Right - Move the 'camera' left and right.
N - Causes all selected level texture objects to snap to the nearest complete texture, based on their current scrolling and scaling attributes.
Q - Displays technical information about the currently selected level texture objects.
W - Displays technical information about internal state of the currently selected level texture objects list.
Number Pad 0 - This button can be used in place of the right mouse button for any action in Lemmings DS Builder.
You cannot reset, add or change keyboard shortcuts for Lemmings DS Builder.


